
The Borrower address priority set-up is used to determine which borrower address should be used for each system job. There are various system jobs that generate output for borrowers: Overdue 1 through 4, Reservations, the Accept/Giro jobs, etc. At the system level, for each of the jobs, the library chooses which borrower address should be used for correspondence and whether the guarantor's address (if found) should be used. The address priority set-up is also defined at the Borrower Category level. For each Borrower category, the library can choose, for each of the system jobs, which borrower address should be used for correspondence.
Selecting ‘System level set-up' results in the display of the following for:

For each job, the library can select which address should be used in correspondence. Also, if guarantors are used, the library can decide to override the borrower's address with that of the guarantor for specific jobs. For example, the library might choose to send the 3rd overdue notice to the guarantor's address.
Addresses can be set for: overdues 1-4, reservations, acceptgiro's plus overdues, automatic & manual recalls, acceptgiro's for invoices, direct debits, invoices, collection agency.
The set-up for a specific Borrower category, if done, overrides the more general system settings.
· Logic for determining which address to use:
- The system will check the address set-up at the system level to determine which address to use at the system level for the specific job.
- The system set-up will be checked in order to see if this job uses the guarantor. If this job uses the guarantor and the borrower has a guarantor, the system will switch to the guarantor's borrower record. If the borrower does not have a guarantor, the system will stay in the borrower's record.
- The system will check if there is an address set-up at the borrower category level. If there is, the system will use this set-up to determine which address to use for this job.
- If this address has “Use from” or “Use until” fields set, it will be checked to make sure that the selected address falls into the correct date range and also it will be checked that the “Use address for” field allows the use of this address for the specific job (if null, address can be used for anything). If this address is valid, starting from this address, the system will determine if there is another address that better qualifies for use (is “Use from” date after previous addresses but before today's date). If no other address better qualifies for use, this address will be used. If this address is invalid, the system will start at the first address in the borrower record in order to find the address that qualifies best. If no address qualifies, the first address in use will be used.
In the left hand column all address groups in use are displayed.
After choosing this option the following form will be displayed:
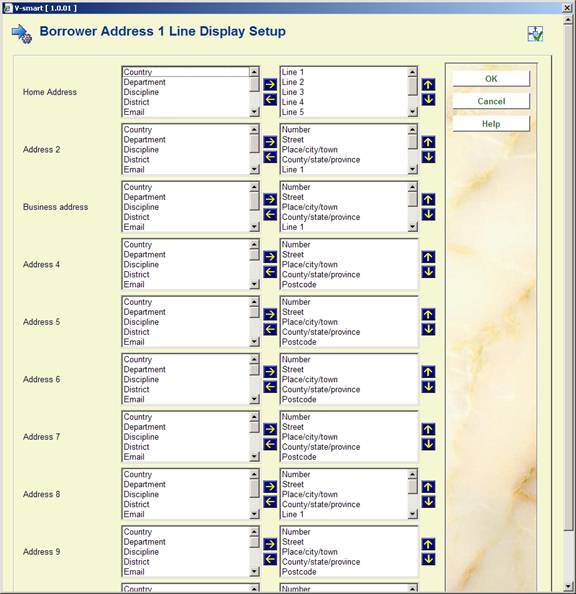
· The fields that should be part of the 1 line address display can be moved to the right. The order of the fields can be modified by using the up and down arrows.
In AFO 481 – Misceallaneous – Circulation workflow - Borrowers, the field Borrowers address display sequence specifies which address group is displayed and in which order; where 3,2,1 means: display address 3 if not defined, use address set 2 if not defined use address 1.
The data elements which are displayed for this address group and the order in which they are displayed is defined here.
In AFO 431, Borrower Administration you have the option to create additional cards for a borrower record. The maximum number of additional cards that can be added is limited by this parameter
After choosing this option the following form will be displayed:

· Enter the maximum for each borrower category.
Note
If nothing has been defined, no additional cards can be created. The relevant button will be inactive on the screen in AFO 431, Borrower Administration.
· In case there are more than 15 borrower categories, there will be a button to go to the next screen.
· The button allows you to go directly to a specific borrower category.
You can create age groups and relate these to one or more borrower categories. If a borrower category is changed in AFO 431 the system will check the valid categories that correspond to the age of the borrower. If the borrower category is not valid, an error message is displayed. If a borrower category is changed in AFO 431 the system will check the valid categories that correspond to the age of the borrower. If the borrower category is not valid, an error message is displayed.
After choosing this option the following form will be displayed.
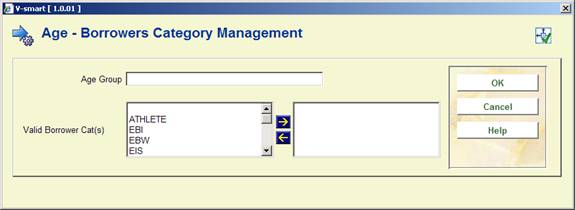
· Add an age group and move the valid category to the right.
If the table contains no entry at all, no age check will be done.
Ages that do not fall in any of the defined age groups have no restrictions on borrower category (i.e. all categories are valid).
Example table:
|
Age group |
Valid categories |
Comments |
|
0-4 |
A,B,C |
|
|
4-12 |
D,D2 |
|
|
13-17 |
E,F,G,H |
|
|
18-64 |
I,J,K,L |
|
|
65-999 |
I,J,M |
Note that borrower categories may appear in multiple age groups (I and J also appear in the previous age group) |
|
* |
X,Y,Z |
No date of birth in the borrower record |
|
+ |
T1,T2 |
Categories that are valid in all cases, independent of whether they figure in age groups. This parameter takes precedence over age related parameters. |
|
- |
T3 |
Categories that are invalid in all cases, independent of whether they figures in age groups. This parameter takes precedence over age related parameters. |
Note
When the system is configured is such a way that an age can fall in multiple categories, the internal global will contain the result of an OR operation. Example:
· The age categories
- 0-4 – category A,B,C
- 0-6 – category C,D,E,F
· correspond to the following ages:
- 0 – A,B,C,D,E,F
- 1 – A,B,C,D,E,F
- 2 – A,B,C,D,E,F
- 3 – A,B,C,D,E,F
- 4 – A,B,C,D,E,F
- 5 – C,D,E,F
- 6 – C,D,E,F
When codes have already been defined, an overview screen will be displayed:

: Select this option to enter a new code. When you select this option, an input screen will be displayed. This screen is explained above.
:Select a code and then this option to modify the code.
:Select a code and then this option to delete the code.
Note
This parameter has no relation to any other age category related parameters.
If your library is set up to generate pincodes from date of birth, you can use this option to automatically generate pincodes based on date of birth for borrowers without pincodes when you leave the borrower's record in AFO 431. These parameters are set at the metaInstitution level.
After choosing this option the following form will be displayed:
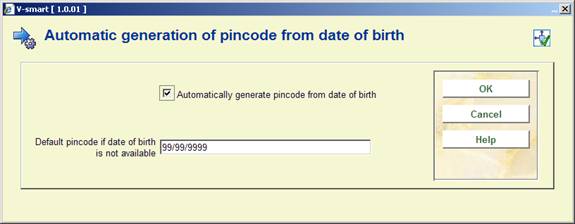
Automatically generate pincode from date of birth: set this flag if you wish to automatically generate pincodes when you leave the borrower's record in AFO 431. This flag should only be set if your library generates pincodes from the date of birth field.
Default pincode if date of birth is not available: enter either a valid date or 99/99/9999.
If the automatic generate flag is set and your PIN generation is based on DateOfBirth and the borrower does not already have a PIN code, the system will automatically generate a pincode (using either the borrower's date of birth or the default in defined above) when you leave the borrower's record.
Pincodes may also be automatically generated for borrowers entered through the WebOpac.
If you have selected to display the district code for the Data to be entered and Data to be corrected options in AFO 482, a dropdown list will be displayed when adding/modifying a borrower record. This parameter determines what the dropdown list looks like
After choosing this option the following form will be displayed:

District display includes: choose a format from the dropdown list. There are four options:
- only code
- only wording (gives nothing if district is not in authority)
- code followed by wording
- wording followed by code
Punctuation between code and wording: When you choose option 0 or 1 you can specify here what the punctuation between code and wording must be.
These parameters are stored at the Circulation metainstitution level. Multiple collection agency codes may be set up for each Circulation metainstitution.
After choosing the Collection agency codes option, a screen appears showing you all of the collection agency codes already set up for your Circulation metainstitution:

: choose this option to create a new code. See section 482.34.1.
: choose a code and then this option to modify the details. See section 482.34.1.
: choose a code and then this option to delete the code.
After choosing the or option an input form will be presented:

Collection code: a unique code for this collection agency. When updating an existing code, this field will be protected (i.e. once a code has been added, you can not modify the code itself).
Description: a brief description of the collection agency.
Locations to link: combo box showing list of institution/location combinations (including institution/* to select all locations for a specific institution). If an institution/location combination is already linked to another collection agency code, the list will not include this combination. Select a location and use the arrows to move it.
Exempt fee types: combo box showing list of fee types that are not collected by the collection agency. Select a fee type and use the arrows to move it.
Monetary threshold: If a Borrower's aged aggregate amount owed (see Aging and Grace period parameter below) equals or exceeds this value, the Borrower's bills and invoices will be sent to the Collection Agency for collection. The aggregate amount is calculated only from fee types not included in the Exempt fee types field.
Collection fee: On going to collection, an additional processing fee will be added to the existing invoices.
Aging parameter (in days): (i.e. 6 years = 2189). Invoices, fines and other payable amounts older than this criteria will be ignored.
Grace period (in days): (ignore current invoices within X days). Invoices, fines and other payable amounts more recent than this will be ignored.
Exempt borrower categories: list of borrower categories that are exempt (e.g.: Staff, Bankruptcy). Select a borrower category and use the arrows to move it.
Email address: enter the email address of the Collection Company to which reports must be sent.
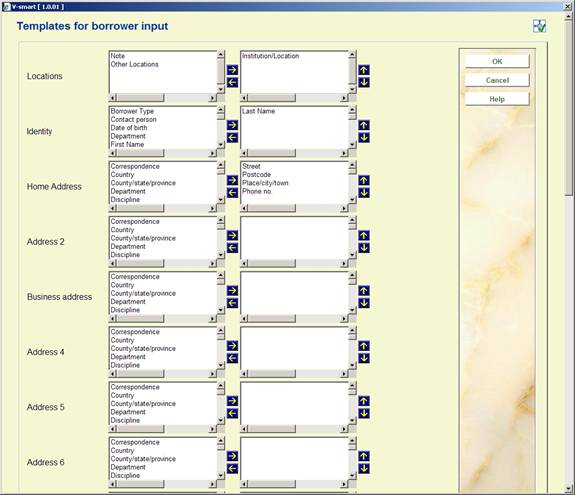
When enrolling a borrower in AFO 431, the user has the ability to select a template that will define the fields that will be included on the “Enter new membership…” form. These templates are maintained here.
After choosing this option an overview screen will be displayed:

: Choose this option to define a new code. See section 482.35.1.
: Select a code and choose this option to modify the details. See section 482.35.2.
: Select a code and choose this option to delete the code. The system will prompt for confirmation.
: Select a code and choose this option to modify the general properties. See section 482.35.2.
: Choose this option to define a new code. After choosing this option the following form will be displayed:

Template ID: Enter a unique code to identify the template.
Description: Free text field.
Default borrower category: Select a borrower category from the dropdown list. The dropdown list will contain only categories from AFO 482 – Borrower category maintenance that are In use.
In use: Check this box to make the template available when entering new borrowers in AFO 431.
After entering the data and clicking , the following form is presented:

· Select the fields on the left hand side
· Click the Right arrow to enter them for display.
· Use the Up and Down arrows to determine the order for display
You can select more than one field at a time.
After selecting the option the following form will be displayed:
see above for a description.
After selecting the option the following form will be displayed:

see above for a description. Note you cannot modify the Template ID of an existing code.
The company Cendris offers address check and postcode check services for addresses in the Netherlands.
Cendris has two webservices: "AdresXpress" and "AdresCheck":
· AdresXpress has as input: Postal code and house number; it returns the full address.
· AdresCheck has as input: Street name, house number and town; it returns the postcode.
Vubis supports 1 to 10 possible addresses for each borrower.
The matching between the Cendris fields and Vubis data is as follows:
|
Cendris field name |
(English translation of Cendris field) |
Vubis data |
|
username |
|
parameter in AFO 482 (see below) |
|
password |
|
parameter in AFO 482 (see below) |
|
straatnaam |
(street name) |
Street or part of Street (parameter in AFO 482) |
|
huisnummer |
(house number) |
Number or part of Street (parameter in AFO 482) |
|
woonplaats |
(town) |
Place/city/town |
|
netnummer |
(phone area code) |
- [we do not use this information] |
|
postcode |
(postal code) |
Postcode |
|
status (only AdresXpress) |
|
- |
|
match (only AdresCheck) |
|
- |
It is assumed that the fields Postal Code, Street and Place/city/town are used for what they say that they are used for.
Theoretically you can put any value in any field. If for example one uses Line1, Line2 etc. to store the address data, the Cendris Web Service won't work.
Please contact Infor if you want to use this functionality.
After selecting this menu option, an input form will be displayed:

In use: This is the general variable to switch on and off the address webservices. It is checked before every action. The default is OFF.
Internet address of the server: This is the Internet address of the server.
Post address of the server: This is the address of the http post on the server.
User name: This is the information sent to Cendris Webservice in the field "username".
Password: This is the information sent to Cendris Webservice in the field "password".
Where is the house number: Use this to specify in which part of the borrower address the house number is stored.
Show option postal code check: Use this option to specify what must happen in AFO 431.
Show option address check: Use this option to specify what must happen in AFO 431.
Automatic check: Perform automatic check in AFO 431.
The automatic check is performed when clicking the button on the borrower entry/update form. So in this case, the specific buttons for the address webservice are not needed.
Automatic update: Perform automatic update after modifying the data.
If not, the form is shown again with the new data retrieved from the Web Service.
Bulk check method: Method used for the bulk check on a borrower savelist in AFO 141.
Bulk check: Automatic update. The default is OFF. If this option is OFF, the bulk check only reports about errors. If this option is ON, the borrower records in the database are updated.
AFO 434 allows for the registration of “contacts” with borrowers. These “contacts” are stored “on top of” contact moments that are automatically registered when a borrower is involved in a transaction in the circulation module (e.g. when he checks out an items, pays a fine, etc.). These contacts can be face-to-face, by telephone, via email, via letters, or through any other type of communication. The contacts can be of multiple types. The contacts can be registered without any follow-on, but can also lead to follow-on actions that need to be taken. An example of the latter case is when a borrower reports an issue that needs to be dealt with.
AFO 434 can be used to register visits, meeting attendance, complaints, questions or any other type of “contacts” between the borrower and the library.
Contacts are registered as contact incidents, which can consist of one or more contact events. As such a contact incident has a two level structure: (1) the main contact incident level, and (2) the contact instance level. The second level is repeatable.
The main contact incident level contains the information that describes the incident in general. Properties on this level are: status, category, description, etc. The contact instance level contains information for each subsequent contact event related to the main contact incident (e.g. each event that is related to the contact incident). In other words: the contact instance level is a chronological string of contacts related to the initial contact incident.
The following system functionality is supported:
·
ability to register a contact incident and the associated “events”
·
storage of related emails and documents
·
a tracking system for follow-up of actions
·
a reporting function to extract incidents
·
email capabilities.
This functionality can be accessed via AFO 431 with the option , in which case only information for a particular borrower is displayed.
Alternatively the functionality can be accessed via AFO 434, in which case information for all borrowers with contact incidents is available as well as the option to add additional incidents for borrowers.
The parameters related to this functionality are set in this section.
After selecting this menu option a sub menu is displayed:
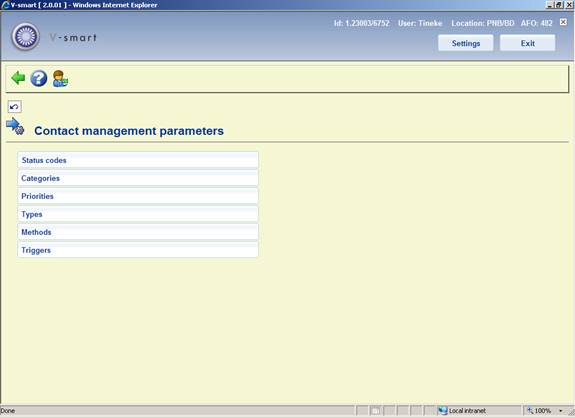
The options are described in the next paragraphs.
After selecting this menu option, an overview screen is displayed:

: Use this option to add a new status code. See section 482.37.1.1.
: Select a line and then this option to view / modify the details of an existing code. See section 482.37.1.1.
: Select a line and then this option to delete the selected code. The system will prompt for confirmation.
After selecting the option or an input form will be displayed:
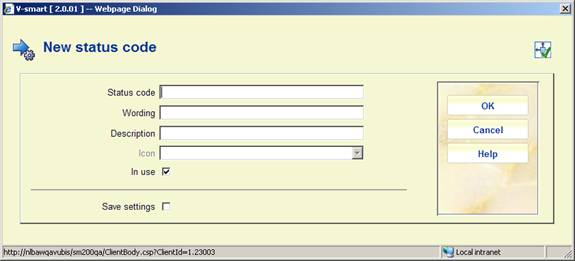
Status code: A unique code identifying the status.
Wording: A brief description of the code. This will appear in the Status column in AFO 434 as well as in the dropdown list for assigning statuses in AFO 434.
Description: Additional information about the code that will only appear here.
Icon: A standard status icon can be selected to add to the code. This will appear in the left hand column of the overview screen in AFO 434.
In use: To denote whether the code is currently in use or not.
Notes
·
The user-defined statuses can be used on top of the default system statuses.
·
User-defined statuses that are not in use cannot be attributed to incidents.
·
It is NOT mandatory to define these parameters.
After selecting this menu option, an overview screen is displayed:

: Use this option to add a new category code. See section 482.37.2.1.
: Select a line and then this option to view / modify the details of an existing code. See section 482.37.2.1.
: Select a line and then this option to delete the selected code. The system will prompt for confirmation.
After selecting the option or an input form will be displayed:
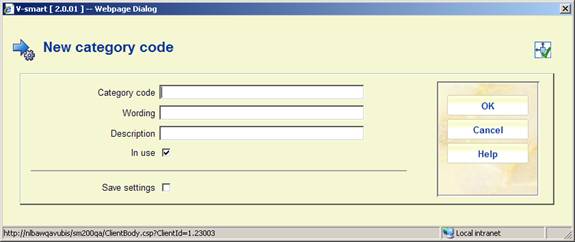
Category code: A unique code identifying the category.
Wording: A brief description of the code. This will appear in the Category column in AFO 434 as well as in the dropdown list for assigning categories in AFO 434.
Description: Additional information about the code that will only appear here.
In use: To denote whether the code is currently in use or not.
Notes
·
Categories that are not in use cannot be attributed to incidents.
·
To be able to work with the Contact incident management, at least one category that is in use must exist. If this is not the case, a message will appear in the management of contact incidents, pointing out that the system is not configured correctly.
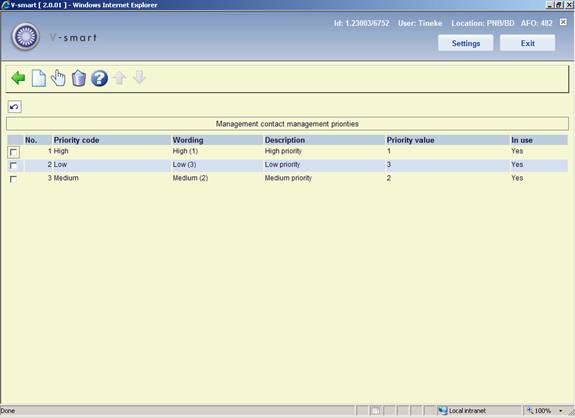
After selecting this menu option, an overview screen is displayed:
: Use this option to add a new priority code. See section 482.37.3.1.
: Select a line and then this option to view / modify the details of an existing code. See section 482.37.3.1.
: Select a line and then this option to delete the selected code. The system will prompt for confirmation.
After selecting the option or an input form will be displayed:
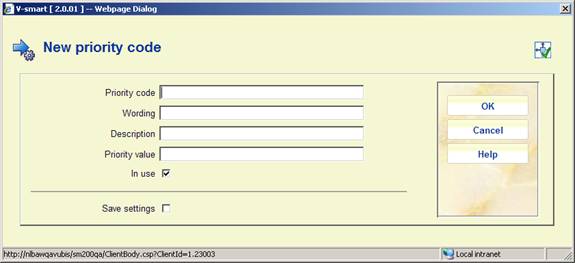
Priority code: A unique code identifying the priority.
Wording: A brief description of the code. This will appear in the Priority column in AFO 434 as well as in the dropdown list for assigning priorities in AFO 434.
Description: Additional information about the code that will only appear here.
Priority value: This field is for future use.
In use: To denote whether the code is currently in use or not.
Notes
·
Priority codes that are not in use cannot be attributed to incidents.
·
It is NOT mandatory to define these parameters. If no priorities are defined, the system will automatically attribute the priority 1 to an incident.
·
Default priorities can be linked to an Incident Type.
·
Priorities that are in use as the default priority for an Incident Type cannot be set to Not in use. Priorities that are attached to existing contact events can be set to Not in use.
· The assumption is that 1 is the highest priority.
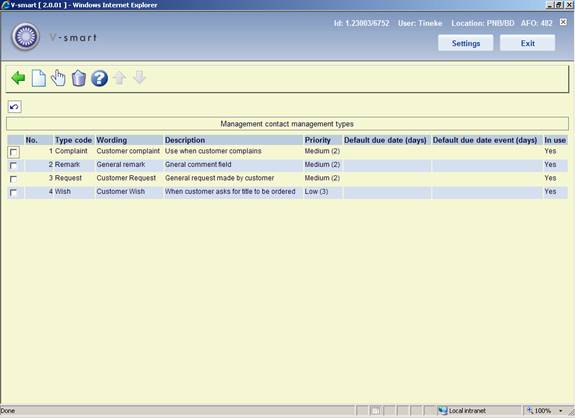
After selecting this menu option, an overview screen is displayed:
: Use this option to add a new type code. See section 482.37.4.1.
: Select a line and then this option to view / modify the details of an existing code. See section 482.37.4.1.
: Select a line and then this option to delete the selected code. The system will prompt for confirmation.
After selecting the option or an input form will be displayed:

Type code: A unique code identifying the type.
Wording: A brief description of the code. This will appear in the Type column in AFO 434 as well as in the dropdown list for assigning priorities in AFO 434.
Description: Additional information about the code that will only appear here.
Priority: Select a default priority for the type from the dropdown list. This can be mdofied when assigning the code in AFO 434.
Default due date (days): Enter a default due date for the type [the number of days that is defined as the period in which the incident should be closed].
Default due date event (days): Enter a default due date for an event attached to an incident of this type [the number of days that is defined as the period in which the event should be “closed” – the latter implies in fact that either the event is closed or a new (next) event is created].
In use: To denote whether the code is currently in use or not.
Notes
· All properties, with the exception of the Type description, are mandatory.
· Types that are not in use cannot be attributed to incidents.
· To be able to work with the Contact incident management, at least one type that is in use must exist. If this is not the case, a message will appear in the management of contact incidents, pointing out that the system is not configured correctly.
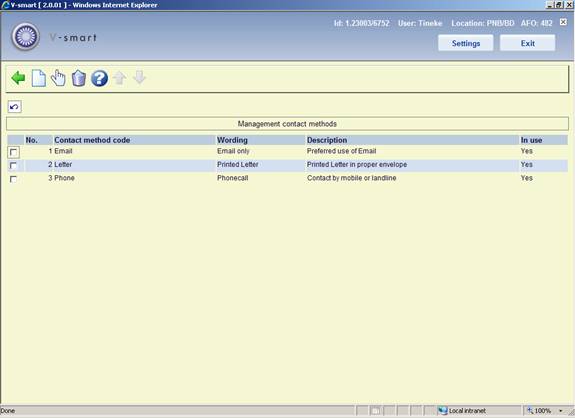
After selecting this menu option, an overview screen is displayed:
: Use this option to add a new method code. See section 482.37.5.1.
: Select a line and then this option to view / modify the details of an existing code. See section 482.37.5.1.
: Select a line and then this option to delete the selected code. The system will prompt for confirmation.
After selecting the option or an input form will be displayed:
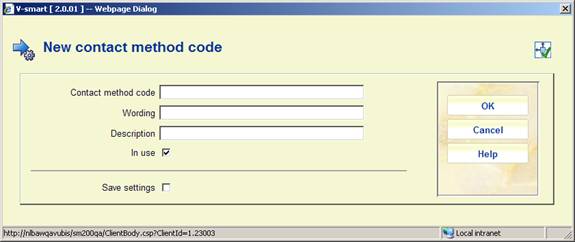
Contact method code: A unique code identifying the contact method.
Wording: A brief description of the code. This will appear in the Type column in AFO 434 as well as in the dropdown list for assigning types in AFO 434.
Description: Additional information about the code that will only appear here.
In use: To denote whether the code is currently in use or not.
Notes
·
Methods that are not in use cannot be attributed to incidents.
·
To be able to work with the Contact incident management, at least one method that is in use must exist. If this is not the case, a message will appear in the management of contact incidents, pointing out that the system is not configured correctly.
The following parameters are used by the trigger batch process. The trigger parameters are defined as rules. None, one or more rules can exist on a single system.
Each rule is defined for a combination of event type and receiver. The rule properties are linked to the type/receiver combination. These combinations define the scope of the rule and can have the following formats:
|
* |
general rule |
applies to all event types and all receivers |
|
type/* |
rule for a specific event type |
applies to a specific event type but to all receivers |
|
type/receiver |
rule for the combination of a specific event type and a specific receiver |
applies to the specific combination of an event type and a receiver |
After selecting this menu option, an overview screen is displayed:

: Use this option to add a new trigger code. See section 482.37.6.1.
: Select a line and then this option to view / modify the details of an existing code. See section 482.37.6.1.
: Select a line and then this option to delete the selected code. The system will prompt for confirmation.
: Use this option to process the triggers. The system will swicth to the standard screen for executing processes.
After selecting the option or an input form will be displayed:

Trigger code: A unique code identifying the trigger.
Scope: As described in the above table; the scope must be unique for the rule, i.e. the same scope can only be attached to a single rule, independent of the fact that the rule is or is not in use.
Report to: Select the required user name(s) from the list.
Report to incident owner: When this is checked the owner of the incident will be notified something needs to be done.
Report to next action owner: When this is checked the owner of the next action will be notified something needs to be done.
Timing: Trigger action timing [x1,x2,x3,…xm] [in which x[1:1:m] = -n:1:0:1:n].
Email: When this is checked the owners will be notified via email.
Description: Additional information about the code that will only appear here.
In use: To denote whether the code is currently in use or not.
· Document control - Change History
|
Version |
Date |
Change description |
Author |
|
|
1.0 |
June 2008 |
creation |
|
|
|
1.1 |
August 2008 |
replaced some screen shots; new options for post code maintenance |
|
|
|
2.0 |
October 2009 |
improved variosu explanantions; punctuation for borrower addresses; expiry date parameter; new menu options for Web service borrower address and Contact management |
|
|
|
3.0 |
July 2010 |
new option for address changes for related borrowers; various clarifications; new fields for ILL |
|
|